How It All Began
Growing up with the Internet, I had always wanted to have my own website. So, I purchased this domain as soon as I earned my first bit of money. A core memory from my childhood is when I visited this domain—back then, it was owned by another person with the same first and last name as me, and they were a known personality in India. You can still go to the Internet Archive and find a good old Web 2.0 website from sometime in the mid to late 2000s. At some point, they must have given up on this domain because I purchased it in late 2016. At that time, my goal was simply to park the domain with a landing page and spend as little as possible on hosting.
Around that time, I was getting into exploring the IoT landscape, so I decided to run a Raspberry Pi 3B+ as a Home Assistant and website hosting server—a simple website hosted using an Apache server (LAMP stack).
In 2021, I decided to build a better website and a blog using WordPress, which I again deployed on the Pi. This way, I only paid for the domain name and provided my own hosting. WordPress is slow in general, but on the Pi, it ran painfully slow. I had to rely on NitroPack, a WordPress extension known for using techniques like advanced caching, image optimization, CSS and JS minification, lazy loading, etc., to make the website load in an acceptable amount of time for the end user.
In early 2023, I acquired some old hardware from work, which included a mini-ITX motherboard and a 6th-gen Intel i7 processor. I decided to upgrade my home web server with this hardware and migrated my setup. As expected, this upgrade made my server run much faster, leading to better load times and an overall smoother experience accessing both the website frontend and the WordPress CMS backend.
In late 2023, I wanted greater control over my network, so I decided to overhaul my home server. I installed Proxmox, an open-source server virtualization platform, along with pfSense to manage my network and Portainer to run Docker containers. Everything worked great for a long time. I was able to host from home because our ISP of choice, Telus, had an open network and allowed this to happen (even though they only offer dynamic IPs for residential customers, which can be easily overcome with dynamic DNS—in fact, that’s exactly what I did for my website).
However, this all came to a halt in December 2024 when Telus implemented Carrier-Grade NAT (CGNAT) on their IPv4 network. With CGNAT in place, port forwarding—critical for hosting services—was no longer possible! Frustrated but determined, I turned to IPv6, which promised to resolve these issues by providing multiple public IPv6 addresses.
Trying out OPNSense
I had my Telus router configured in bridge mode, so I decided to create an OPNSense VM on my home server. My goal was to configure dual-stack networking with both IPv4 and IPv6. After the setup, everything seemed perfect, all devices on my network received both IPv4 and IPv6 addresses, and the internet was working flawlessly.
But there was a catch. After about 90 minutes, my IPv6 prefix would change, altering the final IPv6 address of my home server. This caused my domain name to fail to resolve correctly, even though I had set up dynamic DNS using DuckDNS. To address this, I decided to use both ULA (Unique Local Address) and GUA (Global Unicast Address) within my network. Using OPNSense’s virtual IP functionality, I assigned my devices a stable local IPv6 address. Unfortunately, this didn’t fully solve the issue. Despite the local stability, services still stopped working within two hours after a prefix change.
Reverting to pfSense
Disappointed, I decided to revert to pfSense, which had previously powered my IPv4 network. However, this transition only brought more headaches. While devices received both IPv4 and IPv6 addresses, every time the prefix changed, the internet connection on my devices would drop. To mitigate this, I implemented a cron job that pinged Cloudflare’s IPv6 DNS address every five minutes and renewed the DHCPv6 lease if the ping failed. While this partially worked, it introduced a delay of up to five minutes during which I would lose connectivity. These interruptions were particularly disruptive during work meetings, making this solution impractical. 😤
Proxmox Network Configuration Woes
At this point, I suspected that my Proxmox network interface configurations might be contributing to the issue. I began tweaking the settings, but after a few failed experiments, I inadvertently lost access to my home server even on the local network. Frustrated, I decided to switch my Telus router back to router mode.
The Simplicity of Sticking with Telus’ Router
In router mode, my Telus router seamlessly handled both IPv4 and IPv6. All my devices received stable internet access, and my media server automatically picked up the correct IPv4 and IPv6 addresses. I also set up a Docker container to update the IPv6 address in DuckDNS dynamically whenever it changed. This configuration worked flawlessly, ensuring that my services remained up and running without downtime.
Some Lessons Learned
- ISP Hardware Can Be Surprisingly Reliable: Despite my initial skepticism, my Telus router proved to be the most stable solution for managing a dual-stack network.
- Prefix Changes are a Challenge: Unless your ISP provides a static IPv6 prefix, managing a home server with dynamic prefixes can be tricky.
- Simple Solutions Often Work Best: My attempts with OPNSense and pfSense introduced more complexity than benefits. In the end, the built-in capabilities of my ISP’s router were sufficient.
If you’re considering implementing a dual-stack network at home, take time to evaluate the tools you’re using and consider starting with the simplest configuration possible. Sometimes, the best solution is already in front of you. 😄
Moving Forward with HUGO
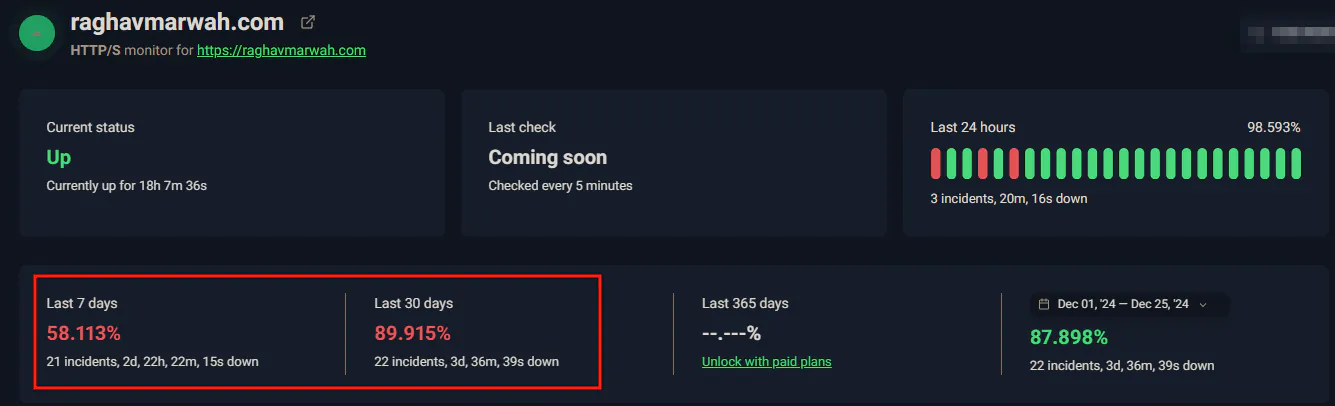
Even though I won the IPv6 war, by that point, I had made up my mind to move on from WordPress and stop hosting my website at home. While it had served me well for years and continues to power a significant number of websites online, I knew it had many flaws, including but not limited to:
- Security Risks – Frequent hacking targets due to open-source nature and plugin vulnerabilities.
- High Maintenance – Regular updates required for security and compatibility.
- Performance Issues – Slowdowns from excessive plugins and poorly optimized themes.
- SEO Limitations – Free plugins don’t do much.
Hugo is an open-source static site generator (SSG) renowned for its speed and flexibility. Developed in Go, it enables rapid website creation by converting content written in formats like Markdown into static HTML files. I completely recreated my website to work with Hugo. It is installed locally on my system using WSL, allowing me to work on my website and preview changes before deployment. Those changes are pushed to GitHub, and then Cloudflare Pages (my hosting service of choice) automatically deploys a new build of the website online. The whole process is seamless and fast.
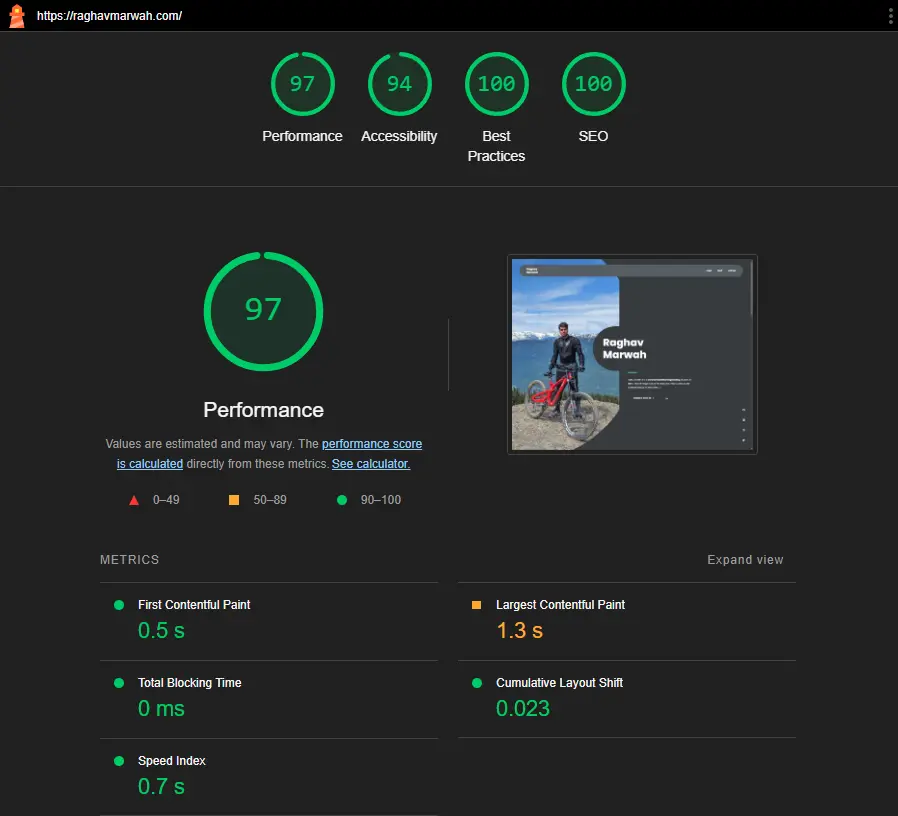
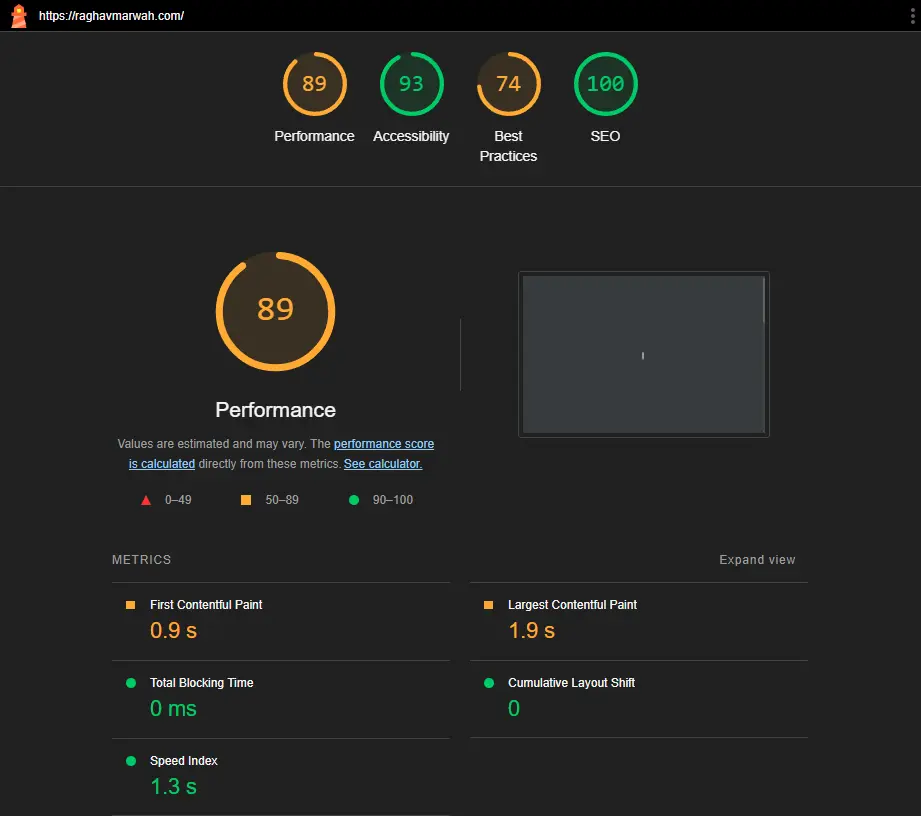
After migrating to Hugo and Cloudflare Pages, my website load times and performance have increased significantly. Check the Lighthouse scores below:
Conclusion
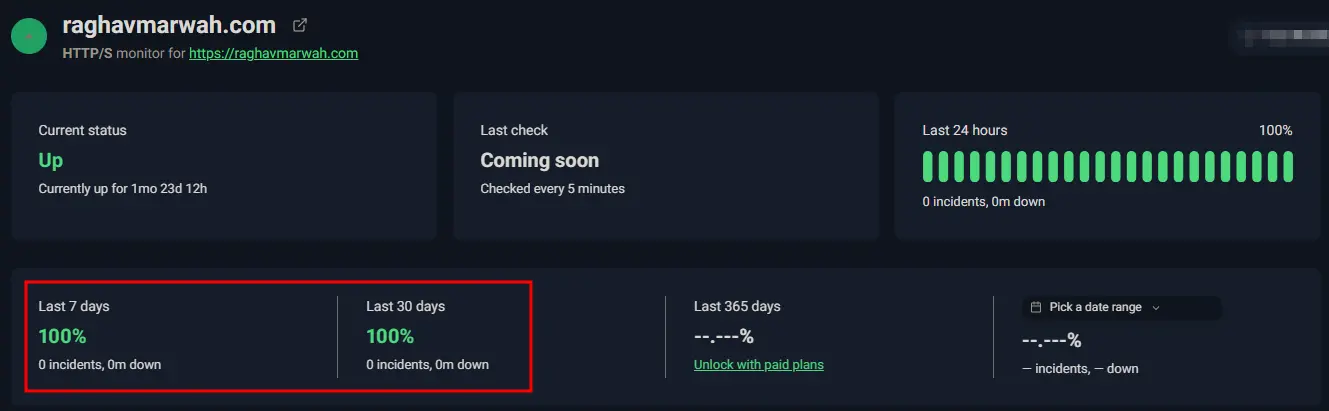
Migrating from WordPress to Hugo has been a game-changer. With Hugo’s speed, simplicity, and seamless deployment via Cloudflare Pages, my website now loads faster and requires minimal maintenance. While self-hosting was a great learning experience, moving to a static site setup has proven to be the most efficient and hassle-free solution. Sometimes, letting go of complexity is the best way forward. 🚀